|
|
|
|
|
| Basic Wire-Handling Strategies for Chronic Total Occlusions | 9/10
|
|
||||||||||||||||||||||||||||||||||||||||||||||||||||||||||||||||||||||||||||||||||||
|
|
||||||||||||||||||||||||||||||||||||||||||||||||||||||||||||||||||||||||||||||||||||
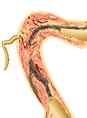
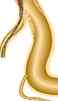
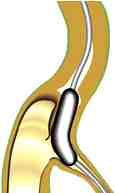
| Figure 14: Stretching and
straightening the vessel with a parallel wire In (a), the proximal bend is obstructing wire maneuverability and making it impossible to reach the distal true lumen, but by (b) and (c) inserting a wire as deep as possible into a distal side-branch to stretch and straighten the vessel, the second wire is able to locate a new channel and cross to the distal true lumen (d). |
||||||||||||||||||||||||||||||||||||||||||||||||||||||||||||||||||||||||||||||||||||
 |
||||||||||||||||||||||||||||||||||||||||||||||||||||||||||||||||||||||||||||||||||||
|
|
||||||||||||||||||||||||||||||||||||||||||||||||||||||||||||||||||||||||||||||||||||
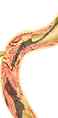
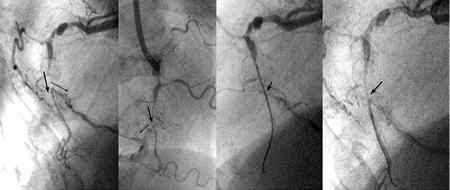
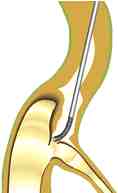
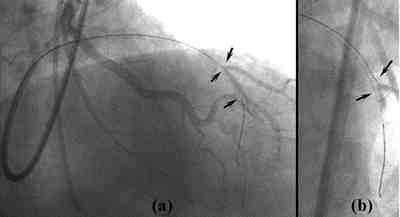
| Figure 15: Breaking through
the distal fibrous cap using the parallel wire technique The first wire passes along a false lumen and into a septal branch branching off from the distal true lumen, and an attempt is made to cross the distal fibrous cap with the second wire. At this point, from (a) the RAO + cranial view, it looks wrongly as if the wire-tip is already in the true lumen. From (b), the AP + cranial view, you can see that the true lumen is being stretched and widened by the first wire. |
||||||||||||||||||||||||||||||||||||||||||||||||||||||||||||||||||||||||||||||||||||
1. Parallel wire technique: this technique involves leaving one wire in place while inserting another wire into the CTO, and requires a few special tricks. When inserting the second wire, it is important to use a 1.5mm balloon, or a Transit or even Interpass catheter, and not just a bare wire. This is to avoid twisting the wires. When the wire is inside the CTO, advance it so that stays parallel to the first wire, and make sure it keeps to the identical same channel as the first. Make sure that the wires do not get tangled up or twisted inside the CTO. After that, once the second wire is in place, pull back to the desired spot.
This technique may come in handy
in the following situations: (1) when vessel tortuosity obstructs the ability
to maneuver the wire, one wire is used to stretch and straighten the vessel
and the other to approach the CTO (Figure 14); and (2) to make a new and different
channel, use the first wire as your guide, under fluoroscopy, to maneuver the
second wire; and (3) when the distal fibrous cap cannot be prenetrated, despite
numerous attempts, position the first wire in a side branch in order to fix
the position at the fibrous cap and possibly to dilate and stretch the distal
end of the CTO in the hope that it will be easier to penetrate afterwards. In
this situation, be careful not to compress the true lumen rather than opening
up the vessel bend (Figure 15).
|
||||||||||
|
|
||||||||||
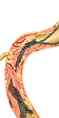
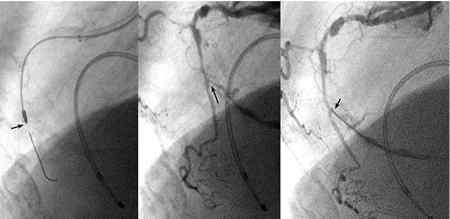
| Figure 16: Breaking through
the distal fibrous cap using the side wire technique In this patient, the wire is restricted by heavy calcification throughout the RCA and by a sharp proximal bend. In addition to this, another bend in the distal portion of the CTO and diffuse plaque build-up meant I had to attempt to make my perforation by turning the wire towards the AM diagonal and trying to get at the distal fibrous cap from the AM ostium (a)(b). The problem was that the wire had gone slightly too far down into the AM diagonal (c). I therefore had to change to a rota-wire (d), and rotablate with a 1.25mm burr. I managed to position the burr in the ostium correctly and not too far, and avoid any distal vessel perforation (e). After rotablation, with the plaque at the AM branch excised (f), the wire advanced easily into the main trunk (g). |
2. Side-branch Technique: this
technique has two broad applications
(i) If at the end portion of the CTO, there is more than a certain angle between
the way the wire is going and the true lumen, it may be hard to get the wire
down the true lumen, and quite easy to create a false lumen. In these cases,
if there is a side-branch forking out from the CTO’s distal portion, try from
the beginning to feed the wire into the side-branch through its ostium. This
is actually the ideal scenario for side-branch technique. Pass the wire into
the side-branch, restore blood flow in the parent artery by dilating at the
side-branch ostium with a 1.5mm balloon, and after changing to a softer wire,
pull back out from the side-branch and return to the parent artery. If the wire
penetrates too far down the side-branch ostium, even if blood flow restore by
balloon dilitation, it may be impossible to get the wire out of the side-branch
into the parent artery. For this reason be very careful where the wire goes.
If the wire goes just slightly past the side-branch ostium, and if the side-branch
is relatively large, using a 1.25mm rotablator burr at the ostium to ablate
the obstruction can enable passage to the main trunk (Figure 16). Bear in mind
that rotablator carries a high risk of perforating the vessel, and thjs trick
should only be attempted when it is definitely safe. Generally speaking, use
the parallel wire technique to get the wire into the true lumen in the parent
vessel.
|
||||||||||||||||||||||||||||||||||||||||||||||||||||||||
|
|
||||||||||||||||||||||||||||||||||||||||||||||||||||||||
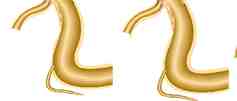
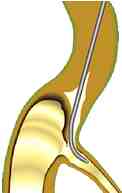
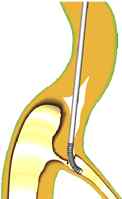
| Figure 17: Side-branch Technique
As in (a) turn the wire towards the side-branch and position it near to the ostium. Getting to the side-branch will be relatively easy if using a stiff wire, but you have to be very careful, assessing the situation using contra-lateral injection, and make sure that you don’t position the wire too far down the side-branch. You then make cracks at the side-branch ostium by dilating a 1.5mm balloon (b). Once you are sure you have achieved recanalization, you switch to a softer wire and locate the main trunk (c). |
||||||||||||||||||||||||||||||||||||||||||||||||||||||||
 |
||||||||||||||||||||||||||||||||||||||||||||||||||||||||
|
|
||||||||||||||||||||||||||||||||||||||||||||||||||||||||
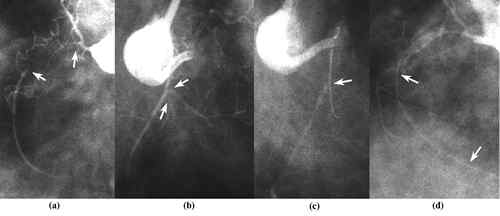
| Figure 18: Case Demonstrating
Side-branch Technique You can see from this RAO view (b) that a relatively large right ventricular branch forks at quite a wide angle. This large side-branch is not suitable for the side-branch technique but the smaller right ventricular branch leading from the same portion is suitable (c). A large dissection can be seen in the occluded portion, but dilating with a 1.5mm balloon and consequent recanalization allows the wire to pass along to the distal true lumen. |
||||||||||||||||||||||||||||||||||||||||||||||||||||||||
|
||||||||||||||||||||||||||||||||||||||||||||||||||||||||
|
|
||||||||||||||||||||||||||||||||||||||||||||||||||||||||
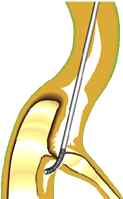
| Figure 19: Causes of Side-branch
Technique Failure When there is thick plaque around the distal true lumen, if the wire position is off from the true lumen by a large margin, it will often pass from the ostium down the side-branch true lumen. Dilating a balloon in this situation will either result in a failure to recanalize the occlusion, or in the creation of a distal false lumen. |
||||||||||||||||||||||||||||||||||||||||||||||||||||||||
(ii) In cases where it is difficult to get through the distal fibrous cap, one can pass the wire through to the ostium of any side branch towards the distal portion of the CTO, dilate a 1.5mm balloon there at the ostium and make cracks in the fibrous cap, making it easier for the wire to get through (Figure 17). This strategy does entail the risk of causing dissection around the true lumen, and should only be attempted under the following conditions. Generally, in the LAD, there ia a high chance of success if the septal branch is small and the angle of bifurcation not too steep. Success will usually depend on the following conditions:(1) the angle between direction in which the wire lies and the bifurcating side branch is less than 90° (Figure 18); (2) the diameter of the side branch less than 1mm; (3) there is no diffuse plaque build-up about the true lumen in the distal portion of the CTO; (4) from the true lumen to the ostium of the side branch, the wire must be just to the side of the true lumen in the distal part of the CTO. A situation like that in Figure 19 should be avoided at all costs; if the wire is not running very close to the true lumen, forget about using a balloon, but opt instead for the parallel wire technique to find a channel right next to the true lumen.
|
|
|
|
|