|
|
|
|
|
| Basic Wire-Handling Strategies for Chronic Total Occlusions | 6/10
|
|
||||||||||||||||||||||
|
|
||||||||||||||||||||||
|
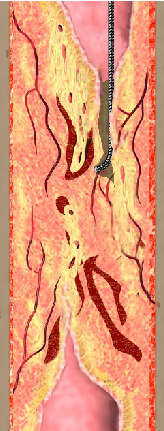
Figure 7: channel(s) made
by wire maneuver |
||||||||||||||||||||||
i) Basic wire-handling technique: The two fundamental elements of wire handling are rotating and “pushing” or feeding the wire forward. However, as it is also important to feel the resistance at the wire tip, when maneuvering the wire, one should use you’re the left hand to feed the wire, back and forth, and the right to rotate the wire. It is possible to maneuver the wire using just the right hand, but using the same hand to rotate the wire, feed it back and forth and feel resistance is unrealistic. Rotating the wire is important because it enables one to minimize resistance at the tip as the wire advances, and makes it easier to achieve the all-important penetration at the fibrous cap. A very skilled operator will also be able to get a feel of the resistance from the whole field of rotation of the wire tip, as it goes forward. One must be careful , to minimize wire rotation so as not to miss the point at which to make the penetration. Excessive wire rotation may also make the channels too big (Figure 7).
Another technique is to feed the wire little by little towards the goal without rotating it at all. This has the advantage over the rotational approach of minimizing the size of any channels one makes with the wire, and maintaining wire direction is straightforward. On the other hand, it is harder to accurately select the direction to go once inside the CTO, and it is difficult to feel resistance in the surrounding tissue. Also, as the wire is deflected by hard tissue, it easily ends up advancing in the softer tissue. Whichever method ischosen, a good grasp of the advantages and disadvantages of both, allied with attention to resistance felt at the wire tip and painstaking wire control, should enable one to arrive at the same result.
When trying to decide on the correct path inside a CTO, will a route that meets very little resistance be the right one? The answer is usually yes, if the proximal portion of the CTO is tapered. When the CTO ends abruptly, or is very long, though, it is easy to end up in a false lumen (between the intima and the media), and in these cases, not uncommon for the wire to meet very little or no resistance even while heading down that wrong path. Unfortunately, there is no way of knowing in advance whether the wire is heading into a false lumen. In order to avoid making a false lumen larger, it is important to immediately realize when the wire has taken a subintimal path. The only thing to do when there is no resistance is withdraw the wire 1-2mm. If the tip is in a false lumen, there will be an unusual and unmistakable sense of it being stuck, resisting withdrawal. The only problem is that if one goes too far down the false lumen and makes it quite large, will not get the feeling of the wire being stuck. The trick is to realise as soon as possible that the wire is in a false lumen. This is done not just by rotating the wire or feeding it along, but by repeated withdrawal. One rule of thumb is that if there is any kind of crunching sensation from hard tissue at the wire tip, it is likely that the wire is in the intima.
The key rules for basic wire handling
then are to get as accurate a picture as possible of the path of the wire from
as many angiographic angles as possible, to realise as soon as possible if the
wire is in a false lumen, and to make sure that if the wire is in a false lumen,
to withdraw the wire and look for a new channel.
Getting the wire to go where you want it to
|
|||||||||||||||||||||
|
|
|||||||||||||||||||||
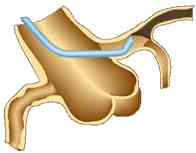
| Figure 8: “Back-up”
using a guide catheter to treat a patient with a CTO with no dimple in the
ostial LAD. In patients with ostial LAD CTOs and no dimpling, it is easy for the wire tip to fall out of position at the target perforation point. Similarly, when back-up doesn’t work and it is hard to penetrate the distal fibrous cap, you can make your penetration by inserting a J1 short tip deep into the CTO, getting it co-axial to the lesion and using back-up. |
|||||||||||||||||||||
1. Penetrating the proximal fibrous cap: Problem scenarios for penetrating the proximal fibrous cap are when the occlusion is several years old, there is no dimpling at the CTO’s proximal end orthe CTO is an abrupt-type. In such cases it may not be possible to get a normal CTO wire into the lesion, the wire slips along the proximal capwhen an attempt is made to pierce it, or it is difficult to determine the ideal spot for the penetration. For the first two of these, a Miracle 12g or tapered stiff wire like Conquest or Cross it 400XT will be helpful, and when the wire is co-axial with the course of the vessel it will be necessary to put a gentle curve into the wire tip. Once a breakthrougn id made, bring the wire out and change the shape, and very probably change to a different softer wire altogether. When one cannot get the wire and vessel co-axial, putting a loose curve in the wire tip, or adjusting the size and angle of the curve may often solve the problem (Figure 6(d)). Again, with the latter, once the penetration point is made, it is necessary to remove the wire and change the angle and size of the curve. As I have mentioned already, there are certain times (i.e. ostial LAD CTOs) when it is useful to insert the guide catheter very deep (Figure 8). And if the wire keeps going down a side branch, it can also sometimes be a good idea to use a balloon to block the side branch to prevent that from happening.
In a proximal CTO, when there is no obvious point of entry, IVUS can often be invaluable. I will go into this in more detail below.
|
|
|
|
|